MSI Afterburner is an overclocking utility from the popular GPU and motherboard manufacturer MSI. It gives you much control over your graphics card from overclocking to changing fan speed. The tool has various other features that include benchmarking, on-screen display, and recording((https://www.msi.com/page/afterburner)). We shall look at each of these and how to use them in the correct way to make proper use of MSI Afterburner.
How to Download MSI Afterburner
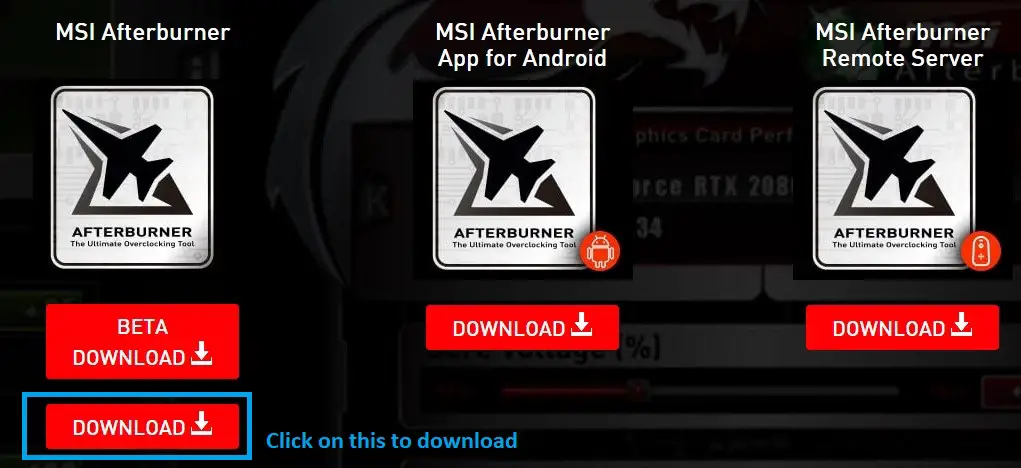
To download the software, you will need to go to the official MSI Afterburner download page and scroll down to the bottom where you will find the option to download MSI Afterburner.


MSI Afterburner Graphs
MSI has a dedicated tool for monitoring your hardware. The tool shows your hardware metrics through graphs. MSI Afterburner monitors your Graphics card’s usage, fan speed, temperature, memory usage, and more. It also shows detailed real-time graphs of CPU temperature, usage, RAM usage, and voltage-related metrics.
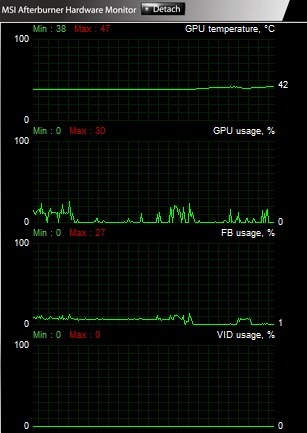
The graphs will be useful for checking real-time metrics when you start using MSI Afterburner’s functions and tweak GPU’s settings. Each time you tweak or change something, it’s recommended to keep an eye on the metrics of your graphics card in order to know what changed. The software, unfortunately, can’t tweak anything related to CPU but can only show metrics related to it.
Overclocking in MSI Afterburner
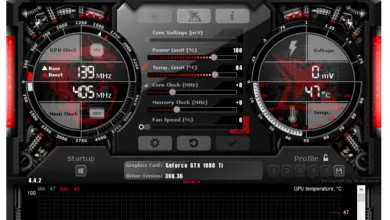
The primary purpose of the software is to overclock your graphics card for which it was initially built which means you can increase the core clock and memory clock speeds of your GPU. This is quite easy to do. There is a basic and advanced way to overclock your graphics card. To get started you first need to know what each thing on the software means.
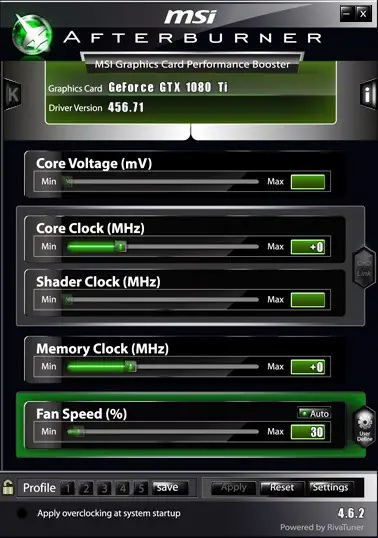
Graphics card and Driver

The top section shows the graphics card you have in your system and the driver version installed.
[/box] [box type=”shadow” align=”alignleft” class=”” width=”100%”]Core Voltage Meter
![]()
The core voltage meter helps to increase the voltage of your graphics card.
[/box] [box type=”shadow” align=”alignleft” class=”” width=”100%”]Core Clock Meter

Core clock meter allows you to increase the clock speed of your graphics card’s core in MHz.
[/box] [box type=”shadow” align=”alignleft” class=”” width=”100%”]Shader Clock Meter
![]()
Shader clock is automatic and changes automatically with the core clock.
[/box] [box type=”shadow” align=”alignleft” class=”” width=”100%”]Memory Clock Meter
![]()
Memory clock meter allows you to increase the speed of your memory in MHz.
[/box] [box type=”shadow” align=”alignleft” class=”” width=”100%”]Fan Speed Meter
![]()
Fan speed meter allows you to change the fan speed from 0% to 100%. By default, it is put on Auto which can be disabled for a manual profile.
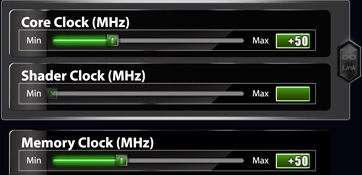
[/box]Basic method– To overclock your GPU, you will need to change the values of the core clock and memory clock. Start with increasing the slider of the Core clock by +25 to +50MHz and a similar increase on the memory clock.
After increasing the clocks each time, stress test your GPU for 10 minutes on software like Furmark for knowing if your GPU can really handle it. If your PC freezes or the program crashes, your GPU has reached its basic overclocking limit.
Also, monitor the temperature continuously and check if it is going above 90 C or not. In case it reaches 90 C, then you should go back to the previous clock or tweak the fan curve(Explained in the next section).
It’s not necessary that the increment on both the core clock and memory clock should be equal and you can manually test out what works the best. Sometimes more increment on the core clock than the memory clock leads to unstable GPU and vice versa is also possible.
Advanced method– If your GPU let’s say reaches its peak at +150MHz on the core clock and +200MHz on the memory clock and you want more performance, then you will need to supply more voltage to your graphics card.
Remember that increasing the voltage will increase the GPU temperature which can reduce the lifespan of your GPU if not provided with enough cooling. Do it at your own risk.
If you can provide proper cooling to your graphics card, then the Advanced method will surely be safe. In order to proceed, you will need to unlock the voltage meter from Settings.
A General tab will open. Under Compatibility Properties, Check ‘Unlock voltage control’ and hit Apply. The software will restart and now you can increase the voltage.
Start by increasing the core voltage by 20% which is very safe and now try stress testing or benchmarking your graphics card on the clock speeds on which it previously crashed. You can increase the voltage percentage up to 100% but most experts don’t recommend doing so.
Remember that you will need to increase the fan speed and overall cooling of your case to avoid overheating.
MSI Afterburner Fan curve
You can tweak fan speed through the fan curve which is an advanced option for cooling your graphics card. Before proceeding to that, you should know how to increase/decrease fan speed manually using the basic way.
The Fan Speed meter has an Auto mode which is by default On and your graphics card’s fan speed will operate according to its inbuilt feature. To manually increase/decrease speed, click on the Auto button which will disable the auto fan speed feature and the slider will start from 25% of fan speed which is the minimum.

After moving the slider to let’s say 70% of fan speed, you will have to hit Apply below for the changes to take effect.
For advanced fan tweaks, you need to access the fan curve. Click on Settings and go to the Fan tab and check Enable user defined software automatic fan control.
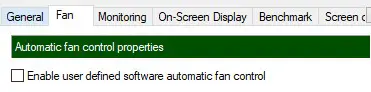
A graph of Fan Speed vs Temperature will show up and unlike the Fan Speed meter, you can reduce the fan speed to as low as 1%.
Creating a fan curve profile
So, let’s say you want to create a fan curve profile with different fan speeds at different temperatures. There will be around 4-5 points on the curve on which you can single-click anywhere to create another point if needed.
If you double-click on the graph curve, the inclined/declined lines will change into parallel lines. This will only increase the fan speed when a particular temperature is reached and will not gradually increase with each degree Celcius.
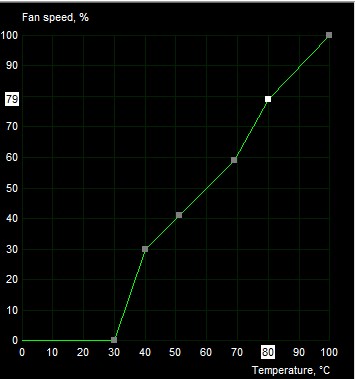
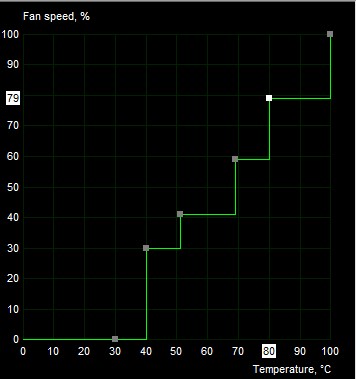
You can completely switch off your GPU fans if the temperature is below 40 degrees C if you want silent operation and once it reaches 40 C and above, it’s recommended to turn the fans on with speed ranging somewhere from 30-40%.
You can gradually increase the point for fan speed for each temperature and it’s recommended to use around 90% of fan speed at 80 degrees C temperature.
Hit Apply after you have made the required changes to the curve. You can also save the settings in 5 different profiles. Click on the Save button and the buttons will be highlighted in green. Click on profile 1 to save what you have changed.
![]()
![]()
You can create different profiles like this and load them anytime. Note that locking the profiles will not allow you to choose the profiles.
You can alternatively check our detailed tutorial on creating a fan profile in MSI Afterburner.
MSI Afterburner On-Screen Display
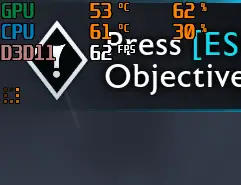
This tool shows the real-time metrics of your hardware on your screen while you are inside a game. You must have seen videos on Youtube where people benchmark particular computer hardware and show the metrics on the top.
You can show many metrics on your screen with the On-Screen Display and monitor how is your PC performing real-time. While we have a detailed post on how to use it, here I will again explain briefly how you can do it.
Go to Settings and click on the Monitoring tab to open up a window like the following:-
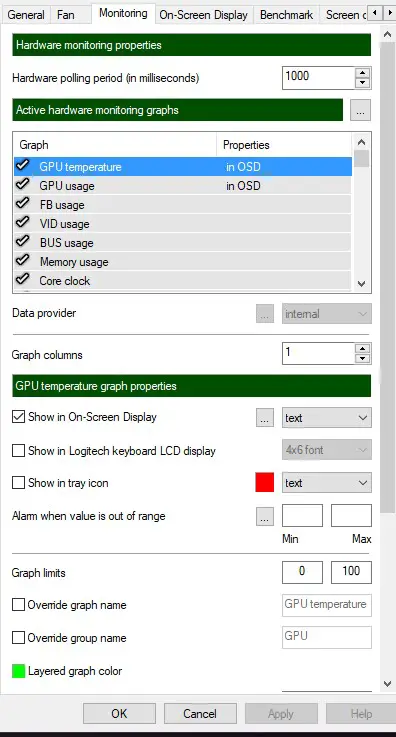
Under the Active hardware monitoring graphs select as many metrics you want to show on your screen by checking Show in On-Screen Display under the GPU usage graph properties.
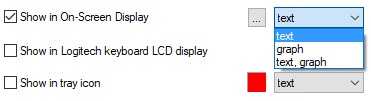
In the front, you will also see a drop-down menu to select Text, Graph, and Text and Graph options.
Once you do this, you can also change the colors of the real-time metrics by clicking on the three dots box on the left as shown above and a window will open with various sections under Active Layout Properties like Colors Library, Group color, Value color, etc.
Hit Apply after you have made your changes and you can do this while you are inside your game and the results will change quickly without exiting your game.
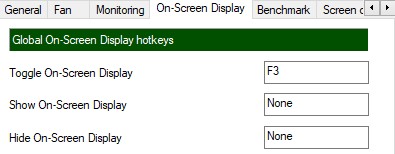
To assign a key for displaying the metrics, go in On-Screen Display tab and under the Global On-Screen Display hotkeys, use any key for Toggle On-Screen Display that doesn’t conflict with your in-game controls in the.
MSI Afterburner Benchmark
Just like fraps and other benchmarking software, MSI also has a benchmarking tool that can benchmark any game and will give you some useful insights.
Under Settings, you have to go to the Benchmark tab and assign Global benchmarking hotkeys to run and stop benchmarking. I assigned F4 and F5 here which doesn’t conflict with most of the games in-game controls.
Under the Benchmark result file properties, you can browse to where the benchmark details are stored once you start benchmarking your game. You can select any drive and folder as you wish.
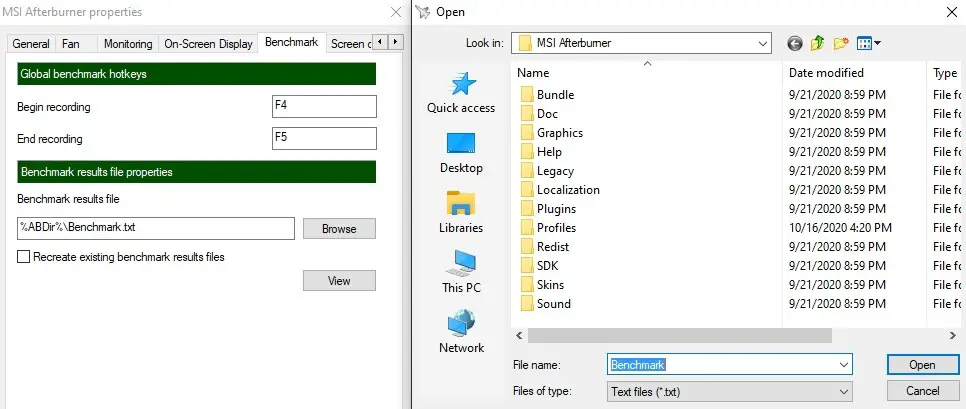
Now you can start any game while keeping the MSI Afterburner open in the background and press the Begin Recording hotkey to start benchmarking. To stop, press the End recording hotkey and the details will be saved in a TXT file.
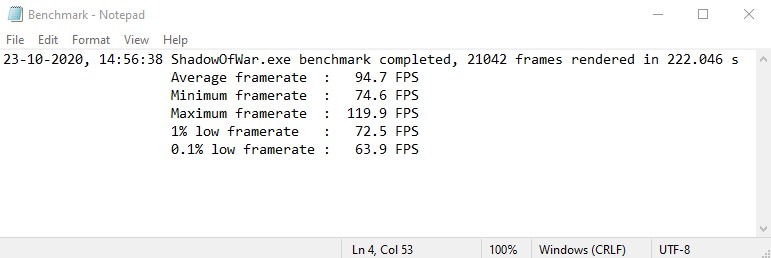
The details will show the date of the benchmark, the game benchmarked, the total number of frames rendered along with how much time was the game benchmarked.
Under it, you will find the Average, Minimum, and Maximum framerate and also 1% and 0.1% low framerates.
MSI Afterburner Screen Capture
You can also take a screenshot of any instance of your game using MSI Afterburner. This comes in handy when you have a non-Steam game and can’t take screenshots using F12.
Go to the Settings and head to the Screen Capture tab and assign a global hotkey to take screenshots.
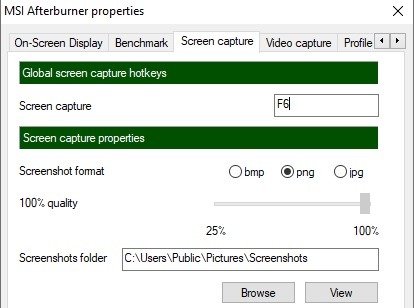
Under Screen capture properties you can select pic format between Bmp, Png, and Jpg. You can also reduce the quality of the picture up to 25% with the quality meter or you can retain 100% quality of the image.
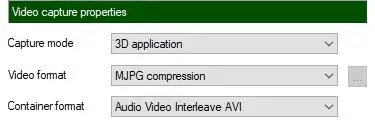
MSI Afterburner Video Capture
With the Video Capture feature, you can record any gameplay. To configure the settings, go to the Video Capture tab in Settings and assign a global hotkey to manually record the gameplay. This hotkey will do both purposes of starting and stopping the video capture.
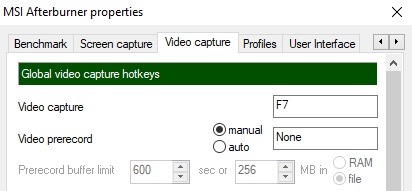
When you press the hotkey inside the game, a small dotted pattern will continue to appear until you press the hotkey again to stop recording. But before you record, make sure you have all the appropriate settings or not.
Under Video capture properties, select Capture Mode as a 3D application to only record your gameplay. If you select the desktop, the tool will only capture video of your screen outside the game and if you select mixed the tool will capture video of everything.
Use video format as MJPG compression and Container format as AVI.
Under these options, you will find various settings to tweak the quality of your gameplay-captured video.
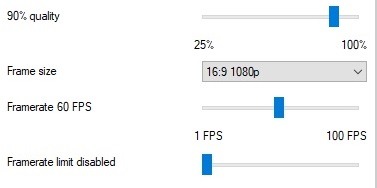
If you want a high-quality captured video, you can select 90% or above quality but that will increase the file size. The lowest quality you can select is 25%.
Select your Frame size according to the aspect and resolution of your monitor or you can simply put it at the full frame which will record according to your monitor’s aspect ratio and resolution without decreasing the quality.
Use Framerate 60 FPS to change the fps of the recorded video from 1 to 100 fps. Currently, Youtube provides 30-60fps on uploaded videos and 60fps is recommended for a smoother gameplay recording.
Make sure you have Framerate limit disabled.
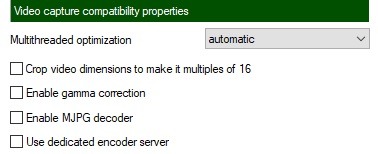
Under the video capture compatibility properties, you will find some advanced options for compression, gamma correction, and encoding. Leave them as it is till you have some trouble recording the gameplay.
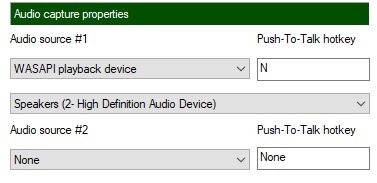
Audio capture properties below it will be needed to record the gameplay sound as well otherwise your recorded video will be soundless. Select the WASAPI playback device under Audio Source #1 and select the device through which you want to record the sound.
You can configure Audio Source #2 similarly. Now hit Apply and press OK to save the settings. Keep in mind that till this Settings window is open you can not start recording your gameplay.