The Q-LEDs on Asus motherboards can help users troubleshoot the possible causes of boot failure.
If any of these LEDs turn on after starting your system and remain always on continuously, then it is due to one or more PC components inside your case.
To fix the continuously ON LED lights issue on Asus motherboards, you need to find out the root cause of the problem before you buy a new piece of hardware.


Types Of Q-LED Indicators On Asus Motherboards
Asus Motherboards with Q-LED indicators contain 4 individual LEDs. These are mostly present on the right edge of an Asus motherboard and indicate problems caused by different components of a computer.
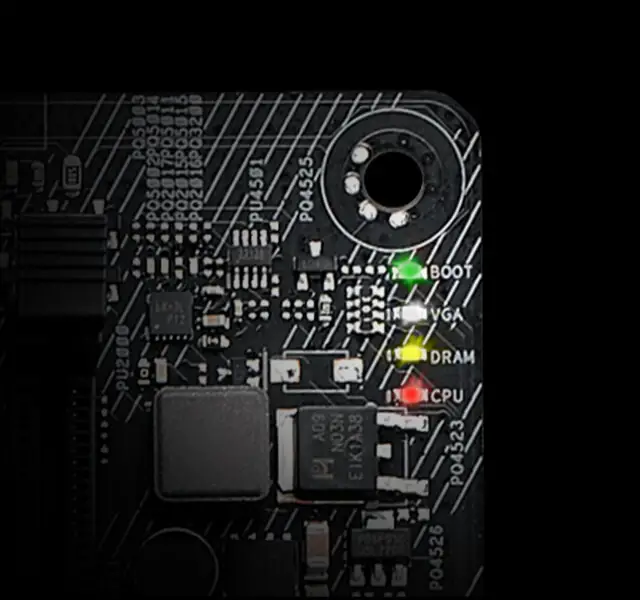
The Q-LEDs on an Asus motherboard are as follows-
Each LED is associated with different components of a computer where BOOT LED is related to storage drives, VGA to the graphics card, DRAM to RAM/Memory, and CPU to CPU/Processor.
Whenever your system fails to detect or establish a proper connection with any of the mentioned components, the associated LED with turn on. These LEDs turn on continuously if there is a hardware failure until the problem is sorted out and don’t let the computer boot into your OS or even BIOS.
Asus motherboards generally cycle through each of these LEDs one by one after switching on a computer. Each LED automatically turns off and your computer boots if there is no anomaly detected.
Reasons For Asus Motherboard Orange LED Light
A continuous Orange LED light on an Asus motherboard indicates a problem with your RAM/Memory. This can be due to an improper connection between your RAM and motherboard or it can be due to faulty RAM.
Sometimes the problem can extend to other things such as BIOS or cable connection which can cause the same orange light issue. Therefore, it’s important to troubleshoot using all ways I have mentioned below if you want a quick fix.
This will not only save you time but can also verify if your RAM is working correctly or not.
How To Fix Asus Motherboard Orange LED Light?
There are numerous ways to fix the orange light issue but only a few of them work in most cases. I have listed 7 ways to sort out this problem and I recommend going step by step in sequence if you want to find out the root cause of this problem.
Reconnect ATX 24-pin Power Connector
Many users don’t pay attention to cable connection and although this might look totally unrelated, reconnecting an ATX 24-pin power connector can fix the issue quickly.
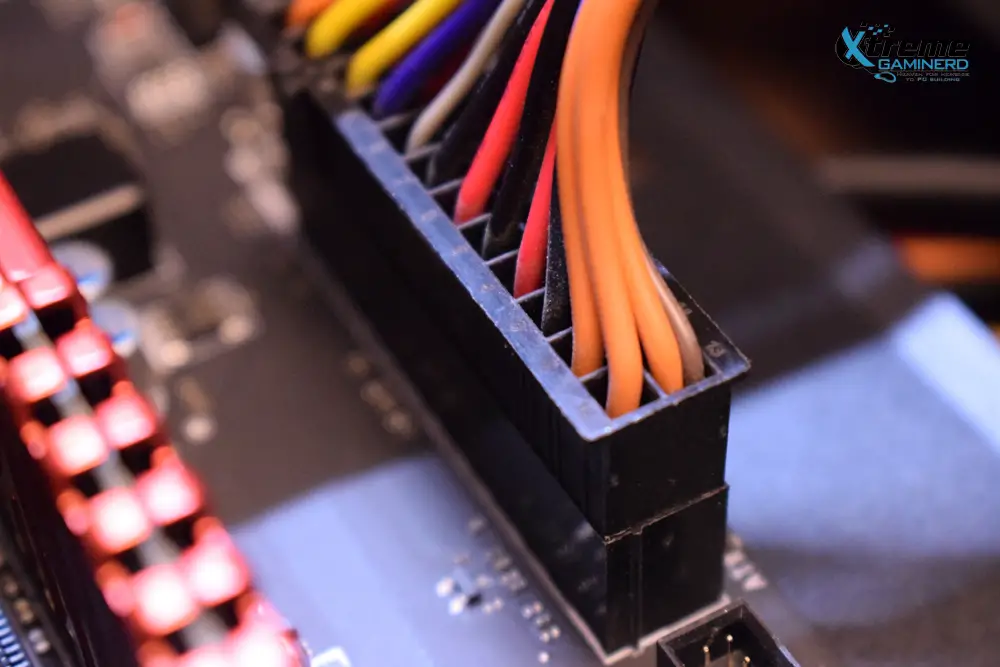
If your ATX power connector is not inserted inside the ATX port on your motherboard properly, your system won’t boot and the motherboard can indicate the problem through an orange light.
Make sure you insert the connector properly into the port or it will be even better if you remove the connector and insert it again with a good amount of force.
Reinstall RAM/Memory Sticks
The easiest and perhaps one of the most common reasons for the orange light is the improper seating of RAM sticks. If your RAM doesn’t make a good connection with your motherboard, you will see the continuous orange light.
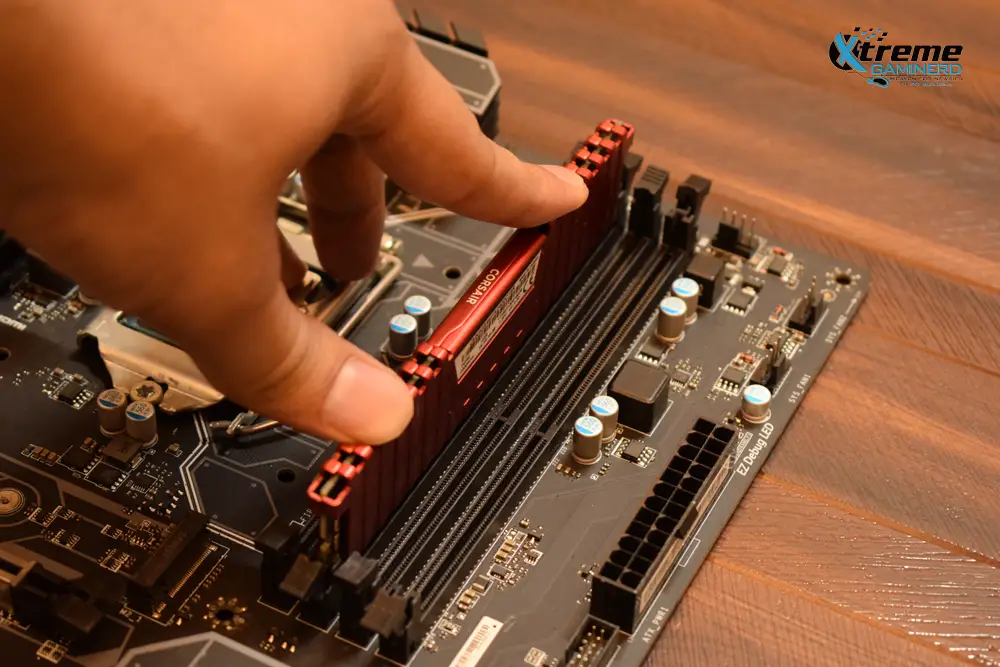
-> Insert the RAM stick or sticks properly into each slot.
-> Remove and insert the RAM stick again if you want to ensure a tight connection. You will hear a click sound once you properly seat the RAM sticks into the DIMM slots.
-> Try using one RAM stick at a time if the issue still persists and change the DIMM slots to verify if there is no problem with the DIMM slots.
Clean The RAM And DIMM
If dirt or dust enters the DIMM slots, then the RAM pins won’t make a good connection. Similarly, if the RAM pins are dirty, the same will happen.
-> Remove the RAM from the DIMM slots and clean the RAM pins with the help of an eraser.
-> Take a piece of paper and fold it thrice. Clean the DIMM slots with it from the inside.
This will remove all the dirt and dust from your DIMM slots and RAM sticks. Put the RAM sticks back into the DIMM slots and turn on your PC. Hopefully, the issue will be fixed.
Turn Off Fast Boot
Asus motherboards have the option to turn off/on fast boot from the BIOS menu. This has caused the orange light issue for many users and it can be easily fixed by Turning Off the Fast Boot from the BIOS.
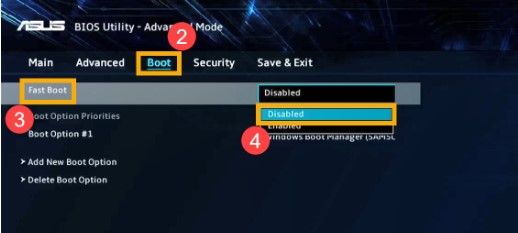
-> Turn on your computer and once you see the “ASUS” logo on the screen, immediately press and hold “Delete” to access your BIOS.
-> Go to “Advanced Mode” by pressing F7 or by clicking the option.
-> Under the “Boot” Menu, disable the “Fast Boot”.
Reset BIOS
If nothing above works, it’s time to Reset your BIOS. This will restore the defaults in your BIOS and can be done in under a minute. You can do so in two ways-
First Method-
-> Turn off your computer and remove the case side panel to access the motherboard.
-> Find the BIOS jumper pin and short them with a jumper wire after turning your computer On.
Second Method-
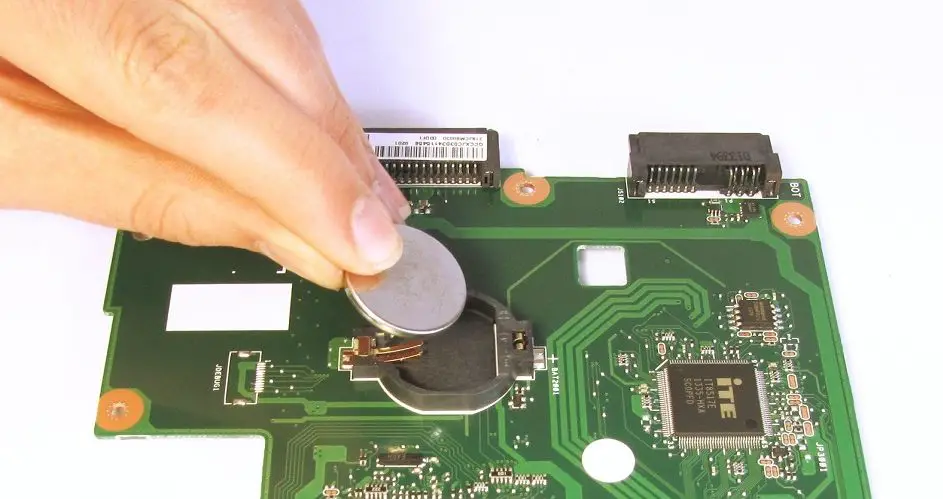
-> Turn off your computer and locate the CMOS battery. Note that it is different from the BIOS Chip.
-> Remove the CMOS battery for a couple of minutes to drain it completely. Put it back and turn on your computer.
With any of these methods, you can reset your BIOS and hopefully, the orange light issue will be fixed.
Reinstall the CPU
If resetting BIOS didn’t help, then you may need to reinstall your processor. At least it is a better option than buying a new RAM to verify if the real culprit is your RAM or your CPU.
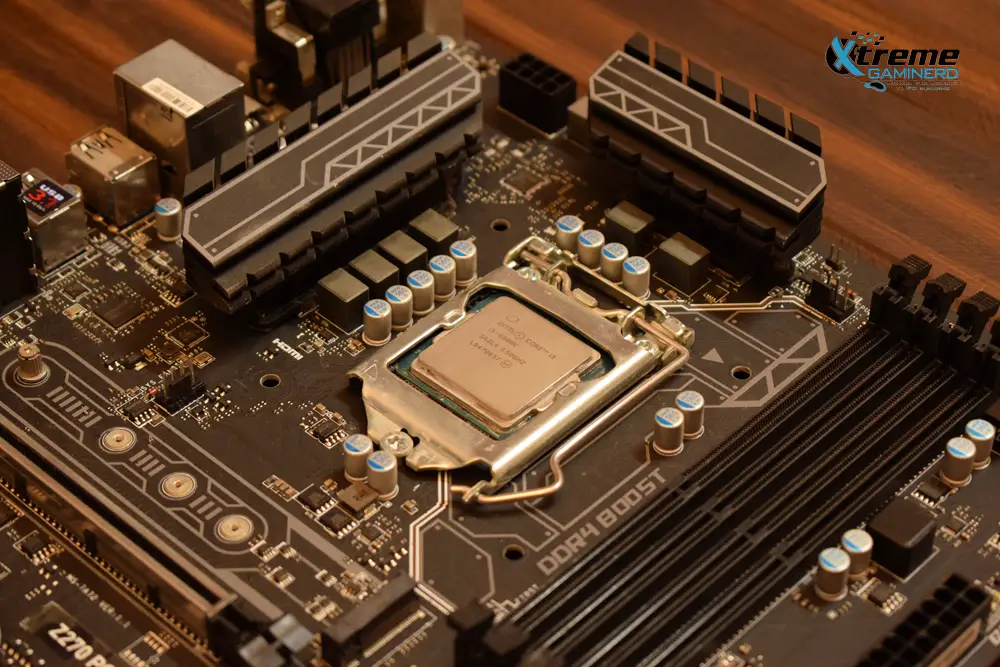
Reinstalling the CPU will be difficult because you will need to remove the CPU cooler and reseat the processor again.
Make sure you also change its thermal paste if it has dried. Remove the old dried paste with the help of isopropyl alcohol and apply a fresh one.
Install the CPU cooler back and turn on the CPU to see if the problem is fixed or not. You can refer to our Build a PC Guide if you want to learn how to install a CPU and a CPU cooler.
Replace The RAM
The last step is to replace your RAM. If no method mentioned above worked, then most probably you have a faulty RAM that needs to be replaced.
Make sure you check the QVL list of your motherboard on the Asus website before buying a new RAM kit.
Final Words
The orange light is generally fixed by reinstalling the RAM or resetting the BIOS. However, the problem can also be related to the cable connection or your CPU.
Let us know if any of these methods worked for you in the polls below.
[poll id=”5″]