RGB Fusion software can be pretty painful when controlling PC components. While it certainly works fine in most cases, it messes up when you want to control any RGB RAM.
RGB Fusion software is an official Gigabyte RGB tool that lets you change and customize the RGB LEDs on your PC hardware such as Motherboard, RAM, Graphics card, etc.
RGB components have several RGB zones and the LEDs can be controlled individually to create the desired effect. RGB Fusion can also let the user sync different components simultaneously, but what if you cannot see the RAM listed in the software?
This issue is pretty common and mostly with the G.SKILL RAM. This issue can be more complex and can be fixed in a few ways. However, it is not necessary that every user will have it fixed with the same method.
You have to try different methods to see what works for you. We have listed down the top 5 ways to fix this problem which have worked for most users.
Uninstall All Other RGB Software
The root cause of this issue is conflicting RGB software. If you are using several RGB components from different manufacturers and have currently more than one RGB software installed, then each software will try to control the same components .
This makes it harder for the RGB Fusion to detect RAM if some other RGB software is controlling the RAM sticks.
Some of the most popular RGB software you may have currently installed on your computer may include Asus Aura Sync, Corsair iCUE, MSI Mystic Light, or Cooler Master MasterPlus+.
If you want RGB Fusion to take control over the RAM fully, just uninstall all the other RGB software even if you lose control over other components. We will take back control of them later.
Update Drivers and RGB Fusion
A simple driver update can sometimes solve the issue. Some users have reported that they have fixed the RGB Fusion incompatibility with the RAM by updating their drivers.
We recommend updating all the drivers including GPU driver and also the Windows operating system to have the best compatibility between your software and the components.
-> After updating the drivers, download the latest version of RGB Fusion software from Gigabyte’s official website, uninstall the older one and install the newer version.
-> Restart your computer and now open your RGB Fusion software as Administrator.
You can permanently change the permission settings by going to the “Properties” and checking the “Run this program as an Administrator” under the “Compatibility” tab.
Related- RGB Fusion not detecting fans
Install G.SKILL Trident Z Lighting Control
The problem of RAM not detected in RGB Fusion is mostly with G.Skill Trident Z memories. The problem can be weird at times and you may have to try different tricks to solve the issue.
Some users are able to fix the incompatibility issue by installing the Trident Z Lighting Control program instead of uninstalling it.
But there is a catch.
-> After installing the Trident Z Lighting Control software, just open it Once and do not run the program again.
This will let the program control the RAM with the default settings. Make sure you do not change any settings from there.
-> Restart your computer and open the RGB Fusion software to see if it can control your RAM.
Alternatively, you can install the Trident Z Lighting Control without opening it -> Restart your computer -> Open the Lighting Control -> Close it, and Run RGB Fusion.
Now, most likely you will see your RAM in the RGB Fusion interface and can configure the RAM normally. However, make sure you never run the Lighting Control or it may result in conflict.
Disable RGB Software Launch At Startup
In case, the above method works, make sure you don’t set the RGB software including both the RGB Fusion and Lighting Control to start with Windows.
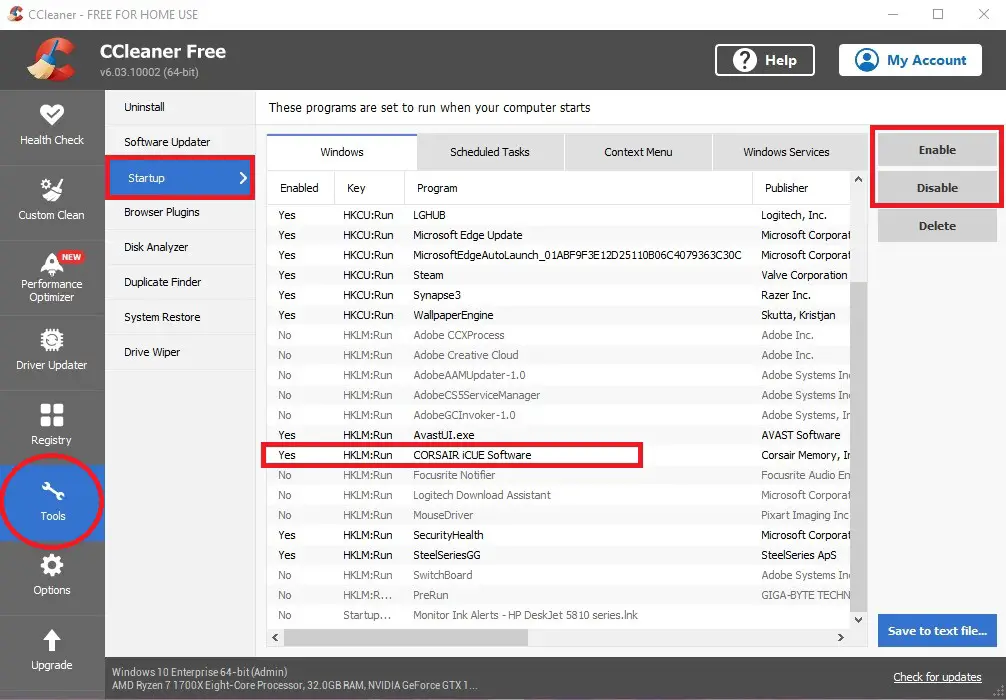
This will mess up the whole configuration you did it before. You can disable the startup launch of both of these software through CCleaner or any other third-party software.
Click to enlarge
-> Download CCleaner and open the program. It’s a free tool and has optional premium features.
-> Click on the “Tools” tab and select “Startup”.
-> Under the “Windows” tab, you will find all the programs that are either set to run with the startup or not.
-> Find all of your RGB software and disable both of them.
Related- Best RGB Fusion Alternatives
Update BIOS
Finally, updating the BIOS is the last resort to let RGB Fusion take control of your RAM. This isn’t a guaranteed fix but works for many users.
You can update the BIOS by downloading it from your motherboard manufacturer’s website.
Click to enlarge
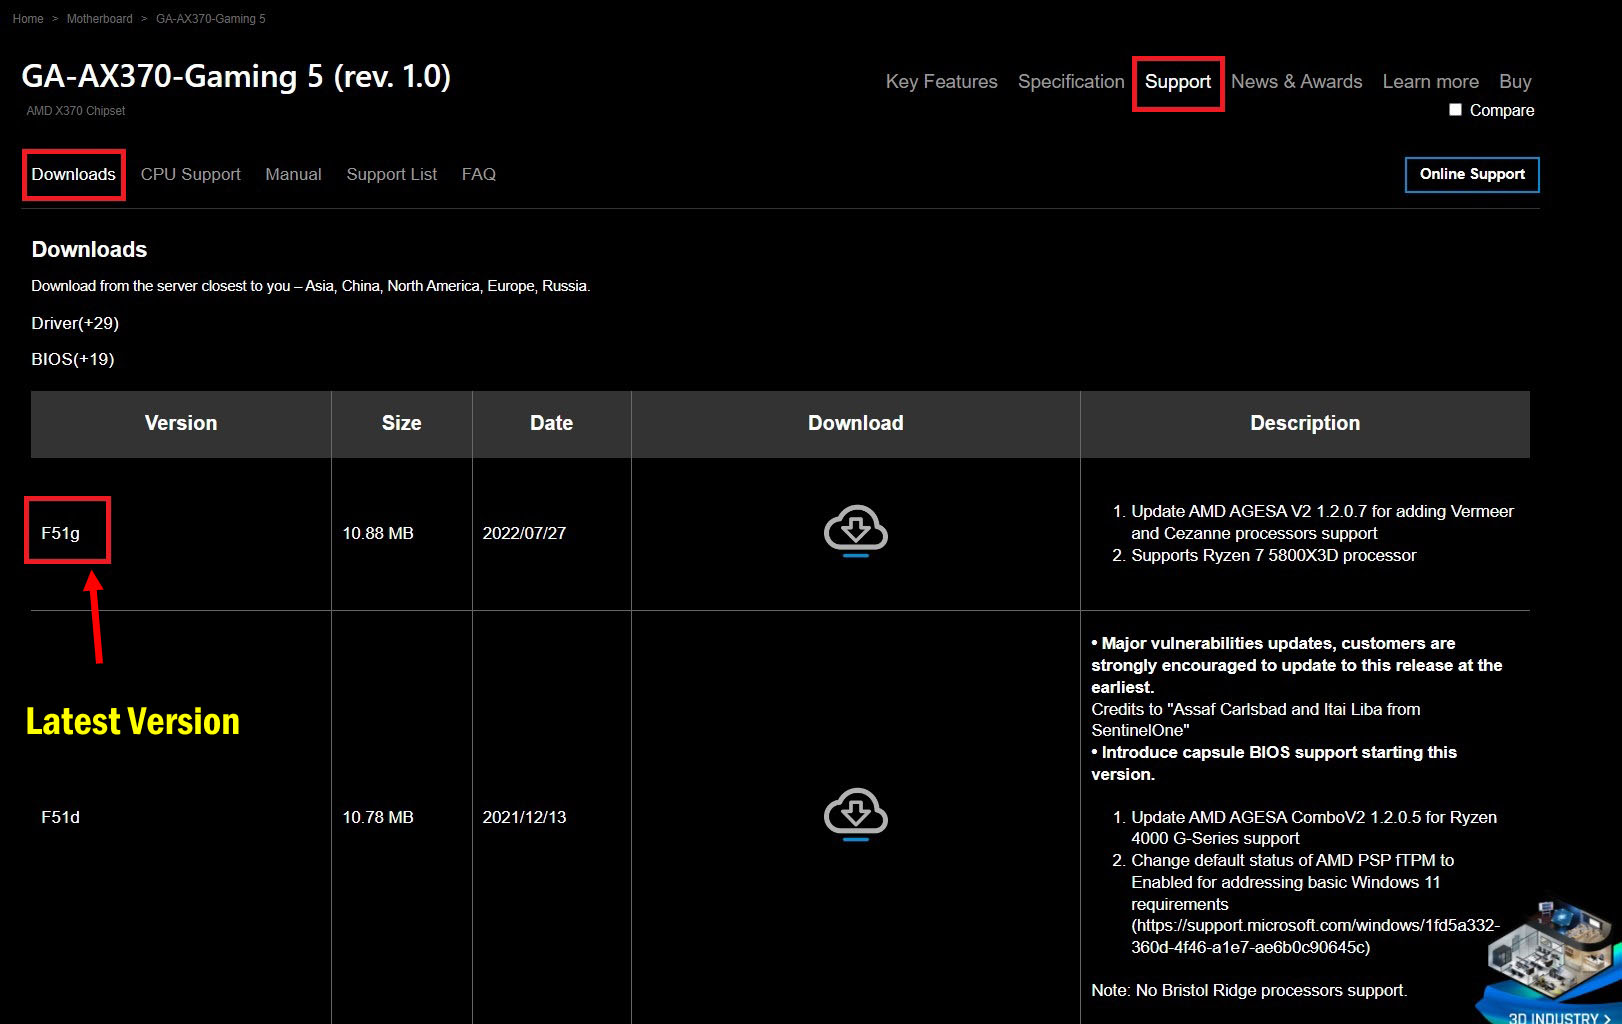
-> Go to your motherboard’s official product page.
-> Click on “Support” and under the “Downloads” tab, select “BIOS“.
Here you will find all the latest BIOS updates for your motherboard. Download the latest one and transfer it to a USB drive.
If you want to learn how to update your BIOS step by step, we recommend Tech Advisor’s guide that will guide you through the whole process.
Final Words
Let us know what method worked for you in the polls below. Also, If you want any help or have any queries, feel free to comment down below and we will reach out to you in a day or two.